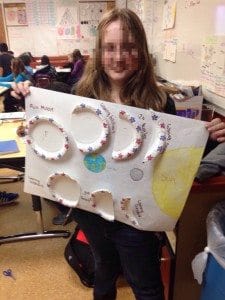
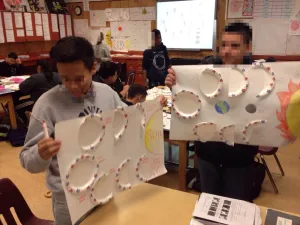
There’s nothing high-tech or 21st century about this paper plate moon phases lab, but it’s a quick and fun way for the students to better understand the phases and shapes of the moons. This can be done in under 30 minutes too!
Supplies you will need for the Moon Phases Paper Plate Lab:
- 4 small paper plates per group
- 1 Styrofoam cup to trace Earth and Moon
- 1 piece of butcher paper
- map colors, markers, etc.
Directions for the Lab
- Show the students an example of what a perfect project looks like. I always like to do this. If you set the expectations high, you will get top-quality work. Not having a sample project is asking for poor work.
- Explain that they are drawing a model of how we see the moon phases from Earth (not space).
- Explain that they will need to draw the Sun, Earth and Moon (using each side of the Styrofoam cup).
- Show them how to cut the paper plates. One is for the full/new moon. Cut one in half for the quarter moons. Cut crescents out of the other two to get both crescent and gibbous moons.
- Glue them on the paper, color, and label.
This is a great activity for reinforcing the moon phases. I especially like it because they are working with the ‘light’ pieces of the moon. Many students want to look at the dark shaded area when determining moon phases and this eliminates that misconception. I also like that they are working with each of the four different shapes. We did these projects in class today in about 25 minutes. Enjoy!


Download Over $100 in FREE Resources
For Middle School Science
Simply create a login below and gain immediate access to a selection of our Kesler Science product line worth $100 - for FREE. There's a full version of every product type! You'll also join tens of thousands of middle school science teachers who receive timely tips and strategies straight to their inbox.


